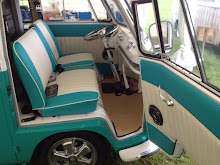
Hello to you all......hear comes the start of the new season and WOW how bizzy we are getting........As some of you may know we run a vw auto trimming firm in sunny Cornwall just out side Turo : www.autotrimvw.com
We do all sorts of car trimming work but specialise in vw upholstery. Bellow are some pictures of our van GERALDINE. she is a 1973 Devon conversion bay window camper. I hope you all like the photos...........
Colin & Cherie
This is a side shot of our van We have taken out the two side windows and repaired all the metal around the glass as the converted vans always rusted hear....and ours was no exception....loll.
With the sliding door removed the side windows repaired she was put into primer ( zinc based primer ) ready for the windows to go back in.
Here you can see the side door removed and a good Friend has cut out all the old rusty bottom end of the door and replaced with new repair panels. You can buy these from RETRO DUBS. Justin who runs this company is very knowledgeable and always ready to help you all.
The side door back on and ready for primer and a small amount of filler along the bottom. This is such a good repair as the cost of second hand rust free doors start around £ 400-500 pounds............
With the pop top up and ready to be cleaned and repaired it will be looking good again for the next 10 years ahead......
A close up shot showing the repair and a good coating of bond primer...GOOD BYE RUST.....
Almost there ...the temporary windows in place ready for new window rubbers to be fitted and the old glass cleaned and put back in.
Here is the inside pic of the pop top showing all the old inner roof lining removed and cleaned ready for the new foam backed head liner to be put in...
.
As if by magic.....all done, This i quite an easy job to do only taking about 3hrs as I'm sure you all agree it makes such a difference.
This is the secondhand porch 911 front seats i got from a scrap yard.....£15.00 the pair.....BARGAIN....I striped them both down to the frame and re painted all the frame work then re placed all the worn padding's ready for the new covers.......
Hear you can see the old covering removed and lay ed out on the new material ready for it to be cut and sewn....YES you are right i used a multi coloured rag rug as the center panels.
This shows the marking you need to make the line up the covers when they are unpicked and transferred to the new material.
The rag rug is not that Strong when cut so before doing the cutting you have to back it with a hessian canvas for strength and it helps hold it all together.
The finished item..................i love the look...WACKY but fun................
As you can see all in the van. i had to modify the seat runners but nothing to hard and wow they are so comfy...roll on summer. I hope you all liked the pictures so far....see you all soon.
Colin & Cherie


This is an very nice post. Thanks for sharing this with us and the information as well.
ReplyDeleteNew Camper Vans