Thursday, 16 June 2011

Geraldine VW Camper having paint put on.............


 Hi all,
Well the big day is here..... Geraldine is having her long awaited paint and lower body wrap !!!!! i am keeping secrete to what graphics are going on the lower section till shes all done...bellow are photos showing the strip down and preparation process...........ENJOY.....


Hear she is as we have all got used to seeing her............all the long hard work over the last year or two in cutting , replacing panel's and welding under side is now paying off............


The last time you will see her like this.......loll


We started by removing the beloved roof rack and all out side trim parts.


Head lights out , wires taped up and wipers removed with new ones ready to go on............


With the pop top canvas removed the hard job began...there was about 30-40 screws all very hard to remove....3 hours later top all of...................


Here we are with the help of Matt.........he is the bud that made this all happen.....cheers Matt


Parts removed............and parts to be used....primer / paint / and yes filler......


You can see the og paint..........red..... when we got Geraldine she was hand painted red............many hours if not weeks of scraping and sanding to get rid of this..........


This is the lower part of the pop top ready for a good clean and some TLC.


As you can see most of the grey primer has come of  ready for a barrier coat of paint then high build primmer.


Sand...filler....sand.....filler.....many more hours....................


The top ready for paint.........YYYAAAAEEEE


masked and lets get some paint on THE BIG DAY...................


Primed then flatted back then primed again...............


And there you have it.........well the top any way........more to follow.,


Look a great shine........me smiling from ear to ear...............keep looking for more photos

colin.

Monday, 23 May 2011

Geraldine our vw camper her move nearer paint and engine up grade............

 Hi all so sorry its been so long again ....................Well were do i start. Since i last updated you all on Geraldine's progress, The vw trimming has kept me so biz I'm finding it hard to give her the attention she deserves......loll. Well the dreaded day happened we Brocky down in a lay bye and yes i had to call the RAC....lovely man.... still we had to wait over 2hrs.............Had contaminated fuel...so once petrol drained and a few cans later we managed to get home....The very next day brake down number two and this time the fuel pump packed up...............Thanks to Justin at RETRODUBS in chacwater NR/ truro came out with a new pump and of i went.....I decided it was time to pull the engine out and give her a well deserved clean and upgrade and replace any parts ready for the summer.......So hear it goes...................


 This some pics Ive also put in to show the finished repaired window surrounds.............all primed ready for some real paint.....loll.


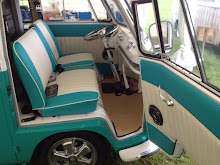
 This is a photo showing the interior coming together...........GREEN   mmmmmmmmmm may be a hint of the paint.....
 Closer photo a few weeks before just after fitting the rock and roll bed.


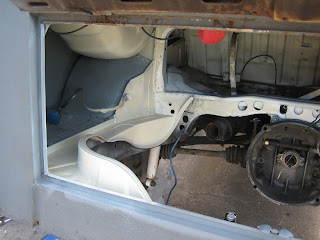
With the engine out work started on the clean down of the engine bay and with the petrol tank removed this helped me to repair any hiden rust...........


 Wider angle photo showing the painted engine bay area.... looking good.....


 As you can see the engine striped down cleaned and checked for and worn parts...........You can see two new items.....Two inlet manifolds for the reconditioned twin Weber carbs  mmmmm


 The engine looking good.......re painted tim wear and a few chrome bits makes all the difference..............Note the free flowing new exhaust...........


 All done ..............paint and chrome and some performance parts.....


 Engine in with primer all ready now....some more sanding on the sliding door is needed.........


 The primer used is a zinc based primmer, this is a great primer as its not porous like normal primer.....


 The rear of the van.....it needs a new or second hand engine hatch..... its rusted beyond repair.....


 Petrol tank out.....the start of the problems....was bits in the tank.....that was causing all the problems...but all clean now.

 The petrol tank ready to go in the hole you see with all the pipes.


hear you can see the petrol pip neck....this was the problem it was leaking and bits were falling of into the petrol tank.....

 Hear you can see Geraldine having an operation.....well rust cut out and Sam the weld...putting in new metal...........cool

 This is the new metal all in and ready for some filler and primer and as good as new........
.

You can see how far we had to cut the metal back to get a good starting place for the new panel....note the holes on the inner wheel arch......all cut out as well and replaced.

So keep looking and i will up date you more often............Cheers
Colin.

Sunday, 13 March 2011

Geraldine our vw bay window camper van update

Hello to you all......hear comes the start of the new season and WOW how bizzy we are getting........As some of you may know we run a vw auto trimming firm in sunny Cornwall just out side Turo : www.autotrimvw.com
We do all sorts of car trimming work but specialise in vw upholstery. Bellow are some pictures of our van GERALDINE. she is a 1973 Devon conversion bay window camper. I hope you all like the photos...........
Colin & Cherie

This is a side shot of our van We have taken out the two side windows and repaired all the metal around the glass as the converted vans always rusted hear....and ours was no exception....loll.


With the sliding door removed the side windows repaired she was put into primer ( zinc based primer ) ready for the windows to go back in.


Here you can see the side door removed and a good Friend has cut out all the old rusty bottom end of the door and replaced with new repair panels. You can buy these from RETRO DUBS. Justin who runs this company is very knowledgeable and always ready to help you all.


The side door back on and ready for primer and a small amount of filler along the bottom. This is such a good repair as the cost of second hand rust free doors start around £ 400-500 pounds............


With the pop top up and ready to be cleaned and repaired it will be looking good again for the next 10 years ahead......


A close up shot showing the repair and a good coating of bond primer...GOOD BYE RUST.....


Almost there ...the temporary windows in place ready for new window rubbers to be fitted and the old glass cleaned and put back in.


Here is the inside pic of the pop top showing all the old inner roof lining removed and cleaned ready for the new foam backed head liner to be put in...
.

As if by magic.....all done, This i quite an easy job to do only taking about 3hrs as I'm sure you all agree it makes such a difference.

This is the secondhand porch 911 front seats i got from a scrap yard.....£15.00 the pair.....BARGAIN....I striped them both down to the frame and re painted all the frame work then re placed all the worn padding's ready for the new covers.......

Hear you can see the old covering removed and lay ed out on the new material ready for it to be cut and sewn....YES you are right i used a multi coloured rag rug as the center panels.


This shows the marking you need to make the line up the covers when they are unpicked and transferred to the new material.


The rag rug is not that Strong when cut so before doing the cutting you have to back it with a hessian canvas for strength and it helps hold it all together.


The finished item..................i love the look...WACKY but fun................


As you can see all in the van. i had to modify the seat runners but nothing to hard and wow they are so comfy...roll on summer. I hope you all liked the pictures so far....see you all soon.

Colin & Cherie

A Mixed Selection Of Photos Of Geraldine

Hello hear are some random photos i took of our camper vanin differant stages of work.............
What coulor do i say she is ?????????

Grey is now her colour.....soon to be green and cream................. 
This is 3 months after i done the work on the front of the van....time for a spruce up..............

These are the new referbed doors.......I re conditioned all the locks and new window rubers and new door seals...............

The day day i fitted her eye lids......gives her a happy look.......lol

This shows the many hours of hand striping to rid her of the hand paint....then sanding ready for primer.........

As you can see many layers of paint.......this part takes the longest to get right but onece  the primer is on all hiden..........but its important to get it right............

With the sanding done and the welding all done............some filler is needed to make goodon the lowwer rear cornners..........

sand sand sand...............you seam to take more of then put it back on................well worth the time....

As i thought .....the front wheel arch needs replacing...both sides time to get saving......
Front shot showingthe new lower look..cool.... see you all soon....Colin & Cherie